From Mac to Windows: working with WSL2
So I decided to completely reinstall my old Surface Pro 4 and thought to myself: why not give WSL2 - short for Windows Subsystem for Linux - a try and see how good this runs.
To quote the Microsoft WSL page:
The Windows Subsystem for Linux lets developers run a GNU/Linux environment -- including most command-line tools, utilities, and applications -- directly on Windows, unmodified, without the overhead of a traditional virtual machine or dual-boot setup.
Use case
I've heard about WSL in the past, but never really payed much attention to it since I was always working on a MacBook, which is Unix based.
But since I made to switch to working on a Windows machine I have experienced some minor disadvantages that didn't come with my MacBook.
- Some NPM packages don't play well on Windows
- Certain tooling needs patching to make it work on Windows
- Performance is slower: live reloading, build times, ...
My use case was fairly simple: get Node.js and thus npm installed, clone something using GitHub, open it in VSCode and run it.
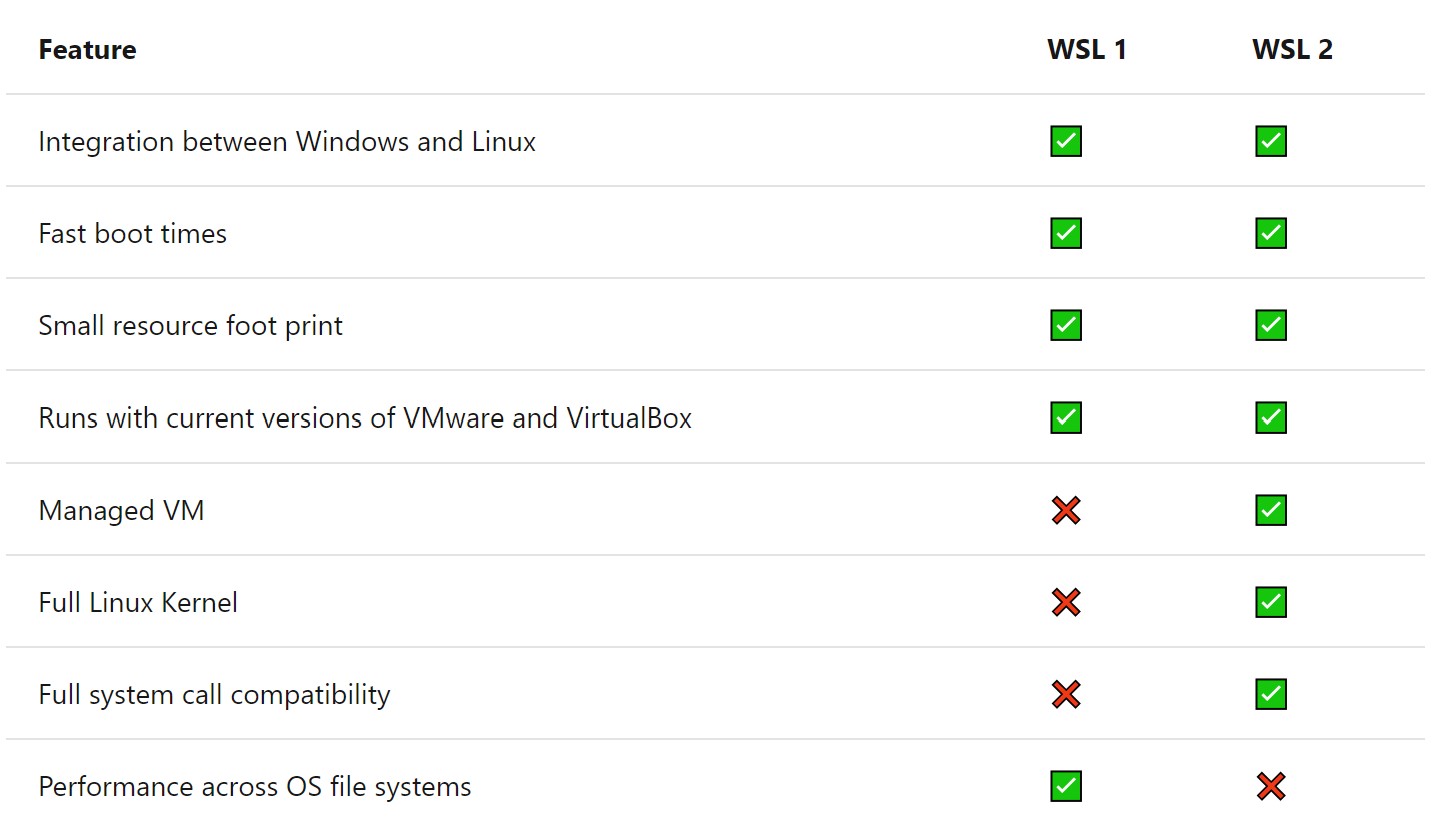
The reason I went for WSL2 is because I can have all the benefits from a managed VM and full Linux kernel and I don't need access to the shared file system.
Installing WSL2
I simply followed the quickstart guide on the Microsoft website and performed the following manual installation steps.
Step 1 - Enable the Windows Subsystem for Linux: run this command as admin in Powershell.
dism.exe /online /enable-feature /featurename:Microsoft-Windows-Subsystem-Linux /all /norestartStep 2 - Check requirements for running WSL 2: since I'm on a x64 system my OS Version needs to be 1903 or higher, with Build 18362 or higher. This one checked out and I performed a system update before moving to Step 3.
Step 3 - Enable Virtual Machine feature: enable the Virtual Machine Platform feature as admin in Powershell and restart your system.
dism.exe /online /enable-feature /featurename:VirtualMachinePlatform /all /norestartStep 4 - Download the Linux kernel update package: install and allow settings.
Step 5 - Set WSL 2 as your default version: another admin Powershell script to run.
wsl --set-default-version 2Step 6 - Install your Linux distribution of choice
I went with Ubuntu and specifically 20.04 LTS. Why Ubuntu you might think? I have been close friends with Ubuntu in a previous life.
Searched for Ubuntu in the Microsoft Store, pressed the download button and eagerly waited.
After installing the Linux distro will ask for a username and password and after that you're ready to go.
One nifty thing I found out is that opening a folder from WSL is done with explorer.exe <path-to-folder-or-file> instead of doing open <path-to-folder-or-file> as I was used to on Mac.
Installing Git on the VM
I followed the steps provided in the WSL Git tutorial, but I only performed the following sections.
- Installing Git
- Git config file setup
I then went to GitHub to add a new SSH key: https://github.com/settings/keys after I created a new SSH key on the VM by following the docs on GitHub.
Once this was set up I was able to clone this blog to my machine.
Since I don't have Node.js and NPM installed yet I can't install the dependencies and run the blog, so it's time to fix this.
Installing Node.js on the VM
To install Node.js I have 2 options. I install it via the distributions that are available from NodeSource, or use nvm - Node Version Manager - so I can manage multiple versions of Node.js.
I went with nvm and installed the latest version of Node.js.
$ curl -o- https://raw.githubusercontent.com/nvm-sh/nvm/v0.34.0/install.sh | bash
$ source ~/.bashrc
$ nvm --version
$ nvm install node
Once I had this installed, I was able to install the dependencies and run my blog.
Using VSCode to access and use the VM
There's also a tutorial on this topic but it boils down to installing VSCode and the Remote WSL Extension. I'll not go deeper into the installation but once installed you can open a project either from:
The WSL command line
By typing in code ., which will open the folder you are currently in. Or typing code <path-to-folder-or-file>.
VSCode
By typing in CTRL+SHIFT+P, typing Remote-WSL and choosing one of the many options.
Conclusion
Installing WSL2 and getting a project working with Git, NPM and VSCode is really a walk in the park. The documentation on the Microsoft website is top notch and contains everything you need to know.
As for the concerns I mentioned at the start of the article, I already noticed a decrease in time when installing dependencies and serving this blog. Really looking forward to do some more real life testing.
From a person coming from Mac, I think this certainly is a step in the right direction to make web development on Windows a fluent experience.